Your favorite game just chugged to 15 frames per second. Your fans scream like a jet engine. Your screen flickers during a simple video export. That's the moment most people realize they need a graphics card replacement, not another driver update.
Good news: learning how to upgrade graphics card hardware is easier than it sounds. You don't need to be an electrician or a PC-building veteran. You need a clear checklist, the right tools, and about an hour of your time.
This guide walks you through the entire process from checking compatibility to installing drivers so you can upgrade video GPU hardware with confidence instead of guesswork.
Signs You Need a GPU Upgrade
Not every stutter means your Video card is dying. However, a few patterns point clearly toward an overdue upgrade vga card decision.
Look out for poor frame rates on games that once worked fine. Also watch out for screen errors, crashes or fans that always spin. If your Graphics card has difficulty with simple video editing or can't get your monitor to the right refresh rate, you should take notice.
However, if the problem occurs only with newly released and difficult-to-handle titles, updating your drivers could help in the first place. Don't be too quick in acquiring hardware that is not needed.
Check Compatibility Before You Buy
This is the step most people skip, and it's the one that causes the most headaches. Before you even browse listings, confirm four things about your current PC.
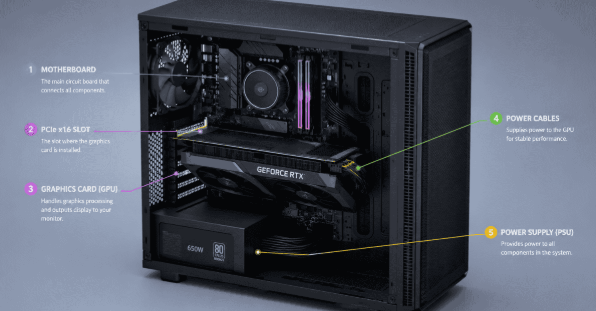
Motherboard slot. You need a free PCIe x16 slot, and ideally your board should support the same or newer PCIe generation as the card (3.0, 4.0, or 5.0). A newer Component in an older slot still works, it just won't hit maximum bandwidth.
Power supply wattage. Every GPU lists a recommended PSU wattage. A common approach is to add roughly 100–150W of headroom above that number, since real world power spikes and other components draw from the same supply. Also check connector type modern cards use 6-pin, 8-pin, or the newer 12VHPWR connectors, and native cables are safer than adapters.
Physical clearance. Measure the space inside your case from the rear bracket to the nearest obstruction. Many current Hardwares exceed 300mm in length and take up two or three expansion slots.
CPU bottleneck. A powerful new GPU paired with an aging CPU won't reach its full potential. Not sure if your CPU will hold your new card back? Run your specs through our Bottleneck Calculator before you buy.
Choosing the Right Replacement Card
Once you know what fits, match the Unit to your actual use case instead of chasing the biggest number on the box. A card built for 1080p gaming is very different from one meant for 4K or creative workloads.
Set a budget first, then compare performance-per-dollar within that range. Independent benchmark sites like TechPowerUp publish detailed comparisons that reveal more than marketing copy ever will.
Tools You'll Need
You don't need a full toolbox for this job. Gather a Phillips screwdriver, an anti-static wrist strap (or simply touch a grounded metal surface first), and a clean, well-lit workspace. Keep the original screws somewhere you won't lose them.
Step-by-Step: How to Upgrade GPU Hardware
Here's the actual graphics card replacement process, broken into manageable steps.
- Power down completely. Shut off the PC, flip the PSU switch, and unplug the cable. Press the power button once more to drain residual electricity.
- Open the case. Remove the side panel, usually held by two or four screws.
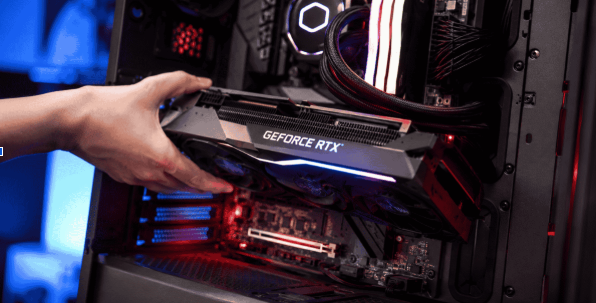
- Remove the old card. Unplug any power connectors attached to it. Unscrew the bracket at the back, release the PCIe slot latch, and gently pull the card straight out.
- Install the new card. Line it up with the PCIe slot, press down evenly until it clicks into place, then secure the bracket screws.
- Reconnect power cables. Attach the required PCIe power connectors directly from the PSU — avoid daisy-chaining too many devices off one cable.
- Close up and reconnect. Put the side panel back on, reconnect your monitor cable to the new card (not the motherboard), and plug everything back in.
- Power on and check. Boot up and confirm the display shows properly before moving to software setup.
Post-Installation Setup
Once Windows loads, uninstall your old GPU drivers using the manufacturer's cleanup tool, then install fresh drivers for the new card. A clean driver install prevents most early conflicts.
After that, check your real-world gains with our FPS Calculator to see the expected performance jump for your specific game and resolution. If temperatures look high, double-check your case airflow.
Common Problems and Fixes
No display after installation. Reseat the card and confirm it's fully clicked into the slot. Check that the monitor cable is in the new card, not the old motherboard port.
The system won't boot. Verify all power connectors are seated properly. A loose 8-pin cable is one of the most common causes.
Fans spin but no picture. Try a different display cable or port, and confirm the correct input source is selected on your monitor.
Performance is underwhelming. This usually points to a CPU bottleneck or an underpowered PSU rather than a faulty card.
FAQs
Do I need a new power supply to upgrade my GPU?
Only if your current PSU's wattage or connectors fall short of the new card's requirements. Check the manufacturer's recommended wattage first.
How to upgrade graphics card for laptop?
Almost never. Laptop GPUs are typically soldered to the motherboard, unlike desktop cards.
How long does a GPU upgrade take?
Physically swapping the card takes 15 to 30 minutes. Driver setup and testing add another 15 to 20 minutes.
Will a GPU upgrade fix low FPS?
It helps significantly if the GPU was your bottleneck. If your CPU or RAM is outdated too, gains may be limited.
Final Thoughts
Learning how to upgrade graphics performance on your PC comes down to preparation. Confirm compatibility, choose a card that matches your real needs, and follow the installation steps carefully.
Take your time during the physical swap, and don't skip the driver cleanup afterward. Get these fundamentals right, and your PC will reward you with smoother frame rates and a noticeably better experience.
If you're still unsure which card fits your setup, comparing a few benchmark reviews for your budget range is the safest next move before you buy.
Meta des: Upgrade your graphics card effortlessly with our step-by-step guide. Discover tips and tricks to enhance your gaming experience today!